GHR Web3.0 Polygon/Ethereum Bridge DAPP
How to bridge tokens from Ethereum to Polygon via the PoS Bridge?

2. Next, you need to connect your crypto wallet. In this example, we will use Metamask.

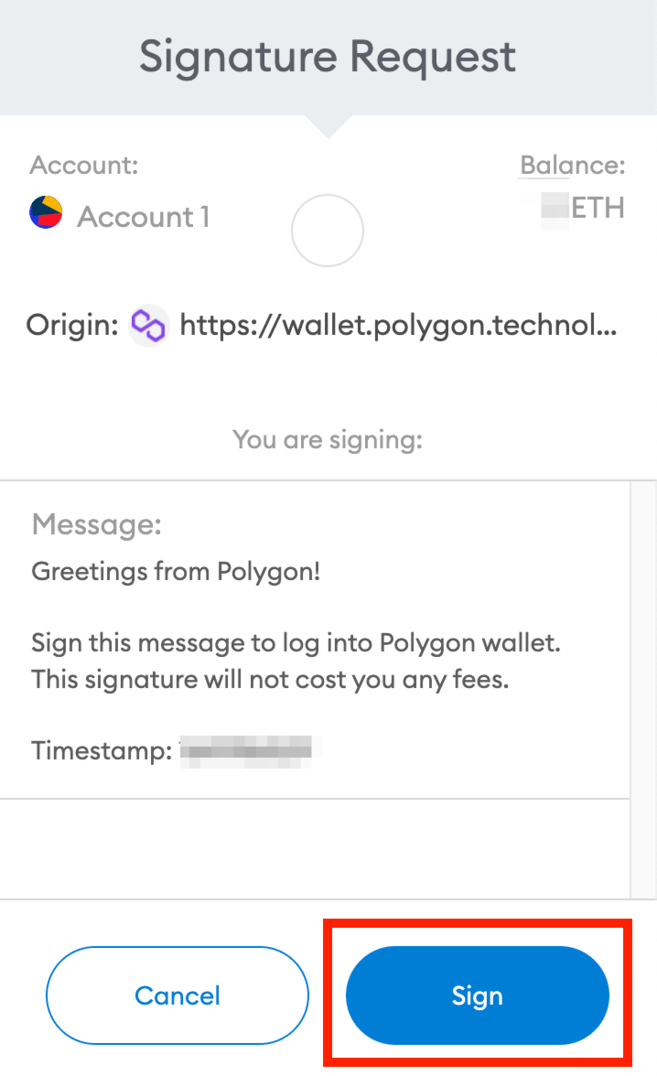
3. You’ll be asked to sign a message to connect your MetaMask wallet to your Polygon wallet. This signature won’t cost any fees. Double-check the URL to make sure you are on the correct website and click [Sign] to proceed.
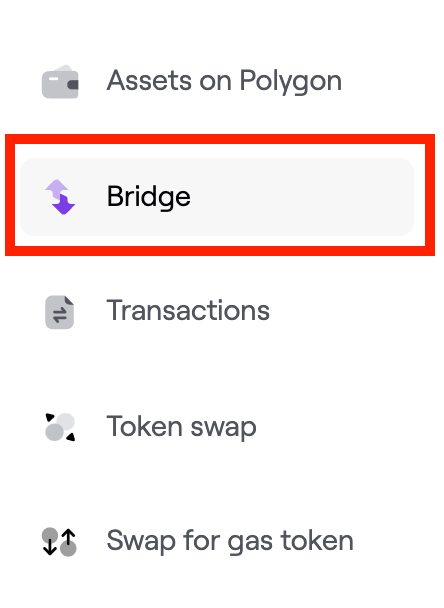
4. You should be redirected to the Polygon Bridge interface. If not, click [Bridge] on the left menu bar.
5. To send your tokens from the Ethereum mainnet to Polygon, go to the [Deposit] tab. Click on the token name to choose the token to bridge. In this example, we’ll use ether (ETH). Enter the amount and click [Transfer].

6. Read the important notes and click [Continue] when you are ready.


8. Review your transaction details, including the token amount and the estimated transaction fee, before clicking [Continue].
Note that the PoS bridge is secured by validators. If you decide to move funds back to the Ethereum network, it can take up to 3 hours.

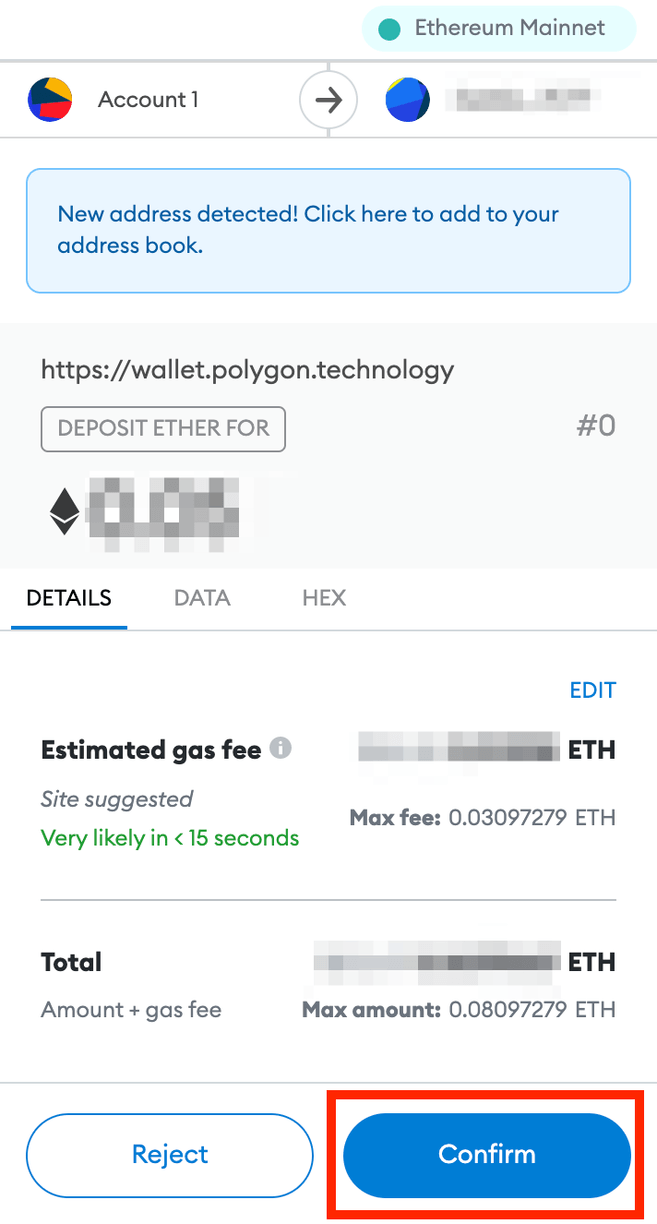
9. You’ll then be prompted to sign and approve the transfer in your MetaMask wallet. Check if the details are correct and click [Confirm].
10. Once confirmed, wait for the tokens to arrive in your Polygon wallet. You may click [View on Etherscan] to check the transaction status.

How to bridge tokens from Polygon to Ethereum via the PoS Bridge?
You can also use the Polygon Bridge to transfer tokens from Polygon to Ethereum. Similarly, you’ll need a compatible crypto wallet, such as MetaMask.
Let’s see how to transfer from Polygon to Ethereum via the PoS Bridge.
1. Click [Withdrawal] on the [Bridge] interface. Choose the tokens you want to transfer to the Ethereum network.

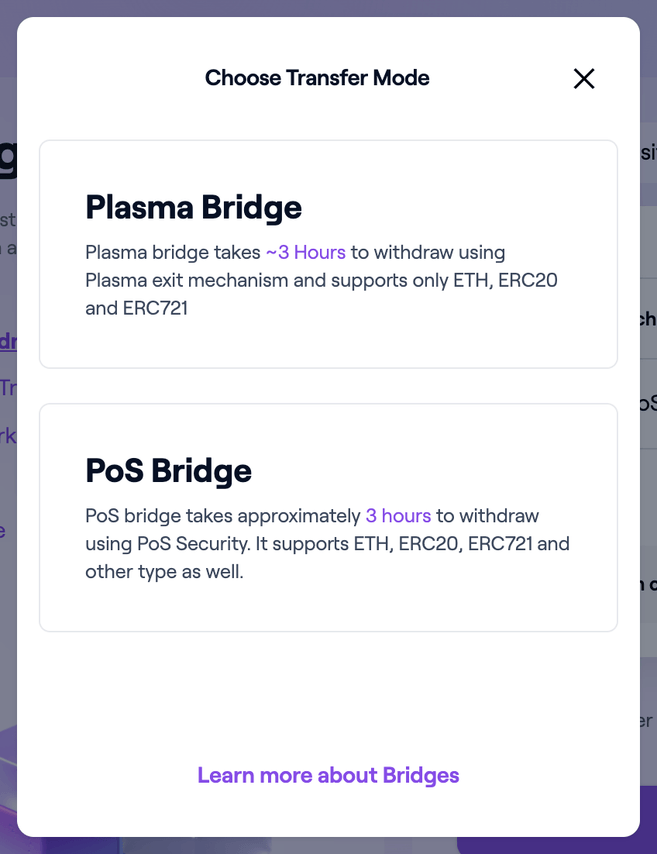
2. You’ll probably notice there’s a [SWITCH BRIDGE] button next to [Transfer Mode]. The platform will automatically select the compatible bridge for your transfer based on the token you choose.
3. After selecting the token, enter the amount you want to send and click [Transfer].

4. Read the important notes and click [Continue] when you are ready.

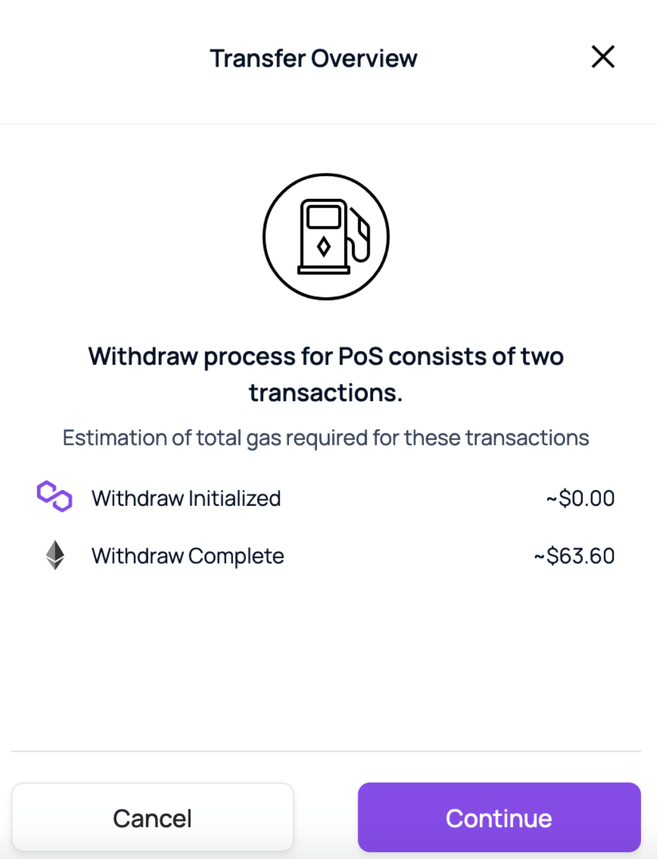
5. You’ll also see the [Transfer Overview] pop-up with the estimated gas fee for this transaction. If you are ok with the gas costs, click [Continue] to proceed.
6. You can review your transaction details, including the token amount, the bridge you’re using, and the estimated gas fee before you click [Continue].

7. You need to sign and approve the transfer in your MetaMask wallet. Check if the details are correct and click [Confirm].
Once confirmed, wait for the tokens to arrive in your Polygon wallet. You may click [View on Etherscan] to check the transaction status.
8. Next, you’ll see the transfer progress. Your withdrawal will be initiated on the network, and the PoS validators will verify your transaction. It might take up to 3 hours to complete, but there is no action required from you.

9. Once your transaction is validated, you need to claim the tokens to your MetaMask wallet. Click [Continue], and you can see the assets when the withdrawal is complete.

How to bridge tokens from Polygon to Ethereum via the Plasma Bridge?
If you wish to transfer MATIC or other Polygon tokens to Ethereum, you can do it via the Plasma Bridge. Note that the Plasma Bridge only supports the transfer of ERC-20 and ERC-721 tokens, which include ETH and MATIC.
Step 1: Adding Polygon to MetaMask
1. To do so, click the [Switch to Polygon] button on the top. Make sure that you’ve already connected your MetaMask wallet.

2. You’ll see a pop-up from your MetaMask extension with the Polygon network details. Click [Approve].

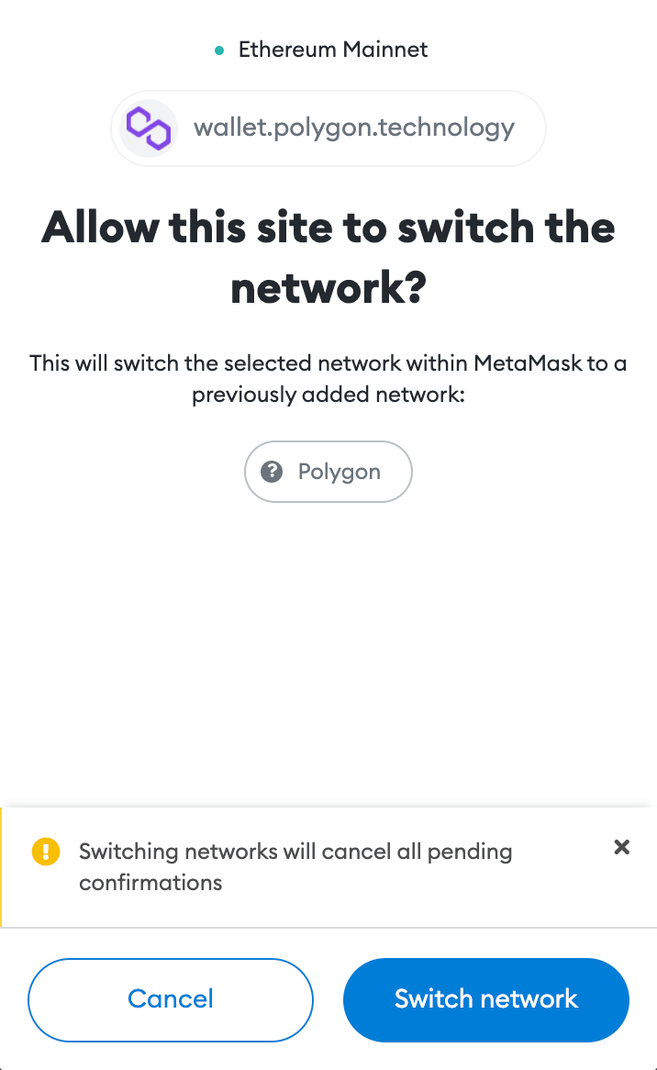
3. Done. The Polygon network has been added to your MetaMask. Now, you need to switch your MetaMask from the Ethereum Mainnet to the Polygon network. You can do so by clicking [Switch network].
4. You can now see MATIC in your MetaMask wallet.

Step 2: Bridging MATIC to Ethereum using MetaMask
1. Go to the [Bridge] interface and click [Withdrawal]. Choose [Matic Token] from the token list, enter the amount and click [Transfer].
The system will automatically select [Plasma Bridge] for the transfer mode.

2. Read the important notes and click [Continue] when you are ready.

3. You’ll also see the estimated gas fee for this transaction. If you are ok with the gas costs, click [Continue] to proceed.

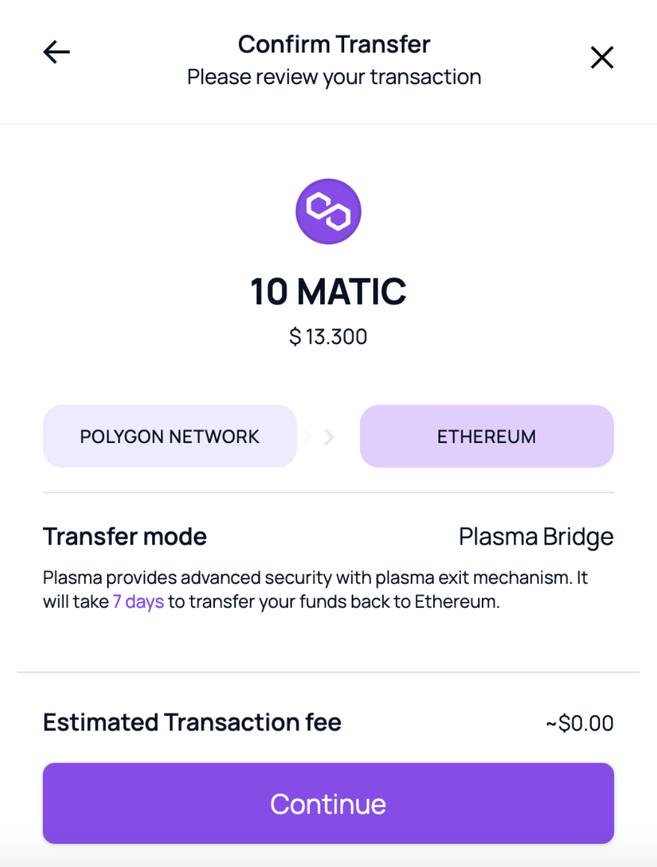
4. Review your transaction details before clicking [Continue].
5. A MetaMask pop-up will appear for you to confirm the transaction. Click [Confirm], and you’ll see the transfer in progress.
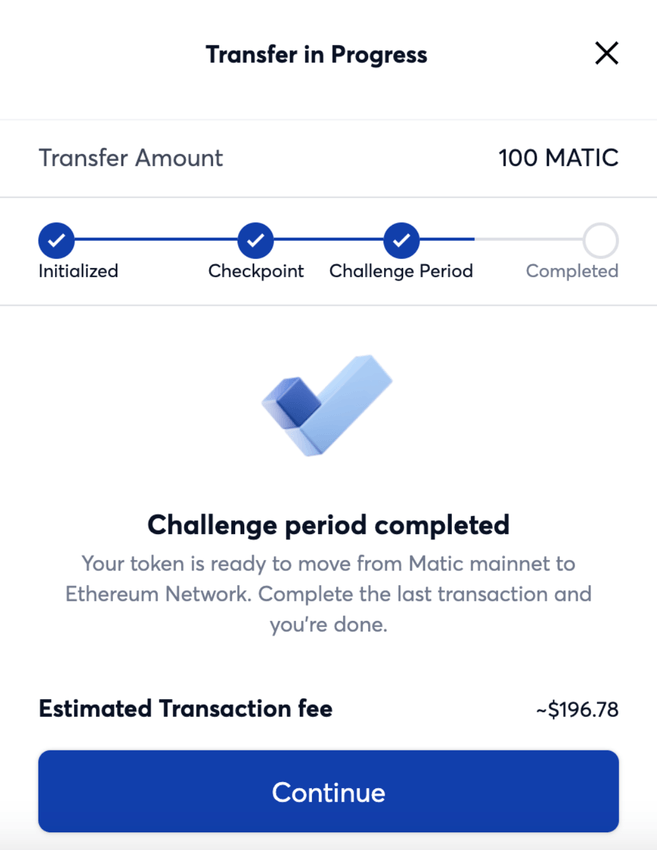
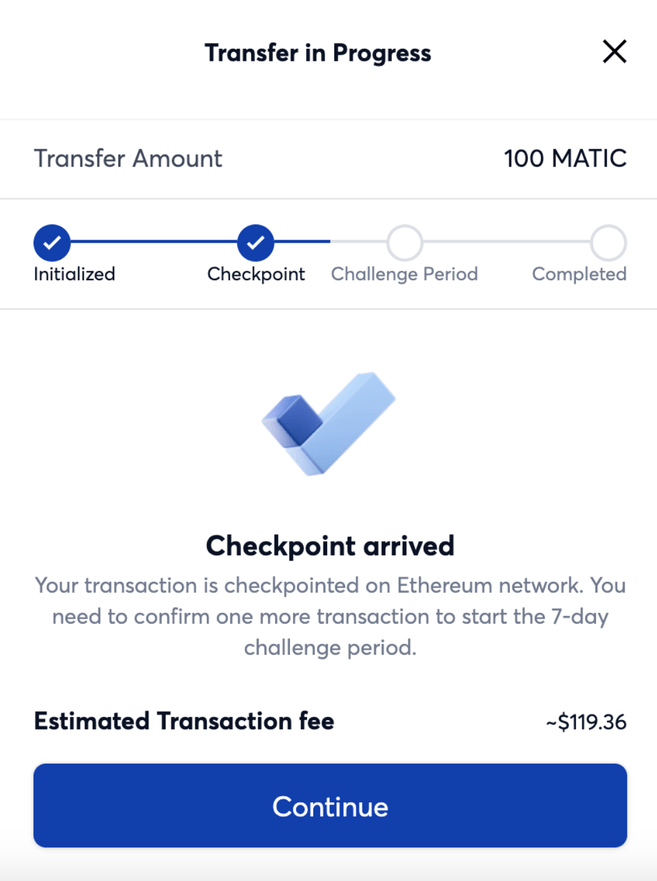
You need to manually confirm three transactions for a Plasma Bridge transfer. The first one is to initiate your withdrawal from the Polygon wallet, which could take up to 3 hours.

6. Once the checkpoint arrives, it means that your transaction is validated on the Ethereum blockchain. You need to confirm a second transaction to start the challenge period. This is a measure to offer increased security for withdrawal transactions.
7. After the challenge period, all you need to do is click [Continue] to send the MATIC tokens to your MetaMask wallet.